Ecommerce Personalization Examples for Streamlining Operations
User Experience Design 8 min read

A well-designed website isn’t just a product of a good combination of aesthetics. There is always a systematic web design workflow that serves as the backbone for every successful website design project.

More than that, you know web designers always claim to do repetitive tasks with developing CSS and optimizing the website for a better user experience. This completion of the same monotonous tasks with just slightly modified steps can take too much of your effort and time.
Building and following a methodical workflow of web design and development, then, will surely help in speeding up your project’s timeline and in preparing your business for growth. Let us show you how to design one for your own organization, as a leading web design and development company.
Web design surely does not just regard your website’s makeup and technical settings of your code, contents, and wireframes. Your web design is a great opportunity for your business to stand out from your competitors and make a good impression on your prospective customers.
Hence, having an efficient web design workflow will help you respond to your audience and customer needs strategically and effectively; helping you follow conversion-centered principles for better website conversions. This in-depth guide will provide you both the high-level and granular look into the web design workflow that you should learn and optimize for.
Preparing to build a systematic web design workflow process allows you to help predict, prevent, and manage potential risks and contingencies.
This is the first official forum to lay the foundation for the success of your website project. It gives you a chance to guarantee that you and your project team are on the same page with the project’s scope, budget, timeline, goals, and expectations.
The objectives of the project and its target audience must be well-discussed with this meeting to avoid conflicts on the actual web design process.
In this primary step, you must pin down the objectives for the web design with the collaboration of the web designer or developer and the client. The following questions must be answered at this stage:
Identifying your objectives is a high-priority task for any web design workflow process. Having answered these questions concisely will set off your website project in the right direction. Ensure that you know who is the site project’s target audience and grow a competitive working knowledge.
You can create a summary of your accurately recognized objectives which will thoroughly help your web design process to smoothly run through the right path of the process.
Before starting to develop your website, you need to conduct a customized discovery and research process.
Here are the steps you’ll need to do:
Your research on these things will help you understand your client’s needs and goals, avoid congestions, and build a smooth-running web design workflow process.
What do you need when you want to visualize every part of your house? A blueprint.
And just like a house design blueprint, following an accurate user experience (UX) design blueprint optimizes a user’s journey to eventually lead to conversion.
Blueprint is a fundamental part of the process of building a house just as wireframes are important in creating a web design project.
Wireframing is a process for designing the structure of the website. It is a visual device that proposes any of your website’s page layout templates. This stage will save you time in the total web design process since you have settled on the layout of your ideas for the website before starting the actual web design.
Here are two types of wireframes you can work on:
Lo-fi or low-fidelity wireframes include the primary elements and visuals of the website but are not interactive. They provide the shell of the user interface (UI) and help your team to visualize early concepts and design assumptions of your web design project.
If you are looking for a wireframe that is convenient and easy to adjust with each design iteration, lo-fi wireframes are for you. They can be effortlessly iterated without interrupting the entire web design workflow process.
You can use a full-mock up wireframe for a more in-depth visualization of your web design project. It is a static wireframe that uses more elaborate and visual UI details to show a realistic representation of the end-product of your web design project.
Wireframes work as a communication tool between the web developers and the client. Using it enables you to present your ideas and expectations more clearly.
Site architecture is the way you present your website to the users. You must aim for a site structure that is easy to navigate and user-friendly.
Here are some tips for making a great site architecture:
A well-planned branding elevates your business to be recognized and gain loyalty.
Why do you need branding techniques to improve your sales and gain loyalty? Edelman Trust Statistics show that 81 percent of consumers buy products only from brands they trust. Having a cohesive brand raises your chances of being remembered by your clients.
Note that consistency is a must.
You need to choose the appropriate web design elements consistent with the business’ purpose, products or service, and nature of business.
Consider these elements to build a bold and memorable brand that users are sure to notice.
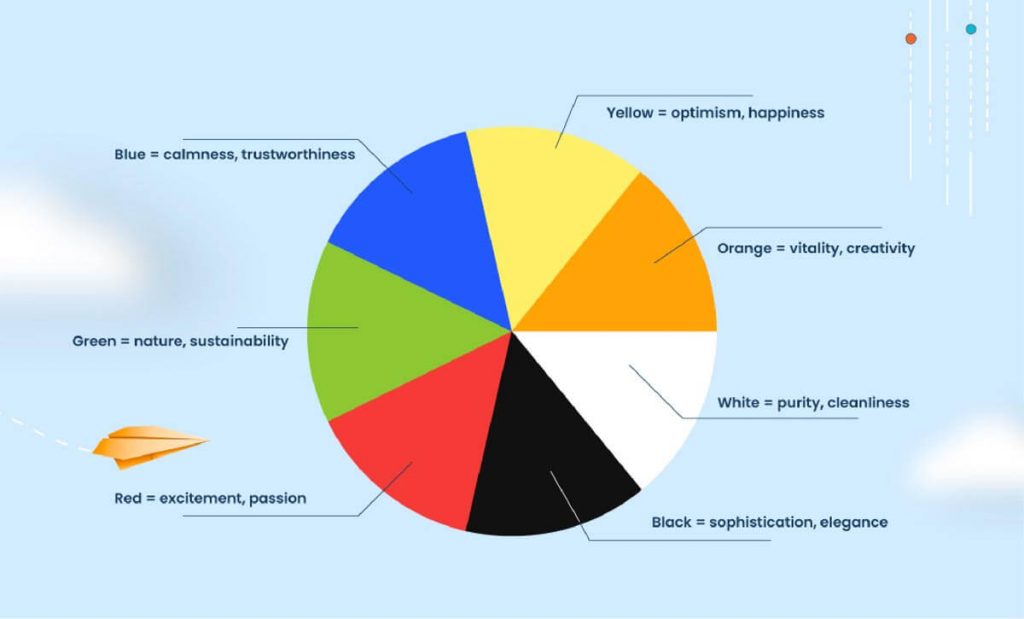
Pick the right combination of colors to provide your audience perception of what your brand is all about. You can use the business logo to identify your dominant base color. Keep in mind that website color schemes are highly essential if you want to make it sharp and organized rather than confusing.
Integrating the right images on your website can help you attract your audience’s attention and guide your page visitors’ line of sight. You can use images to present important information or the things that you want your page visitors to primarily notice.
You can apply the existing brand kit of the business to a framework of element dimensions, layouts, icons, and typeface to produce consistent branding on the web designs.
More than aesthetics, you also need to consider the non-visual web design elements to create a better UX. You must consider making a clean backend code, optimizing website speed, enabling mobile view, and incorporating SEO-boosting features in your website.
Knowing how to code a website that functions faultlessly, loads swiftly, and can be navigated efficiently impacts how your audience perceives your brand.
All set with the planning phase of your web design? Check out this ultimate web design checklist to set you off to the next stage.
After mapping out the web design, you can start working on its content. This involves copy and all matters that are not related to design. You will execute your web design process plan by integrating the content into the website.
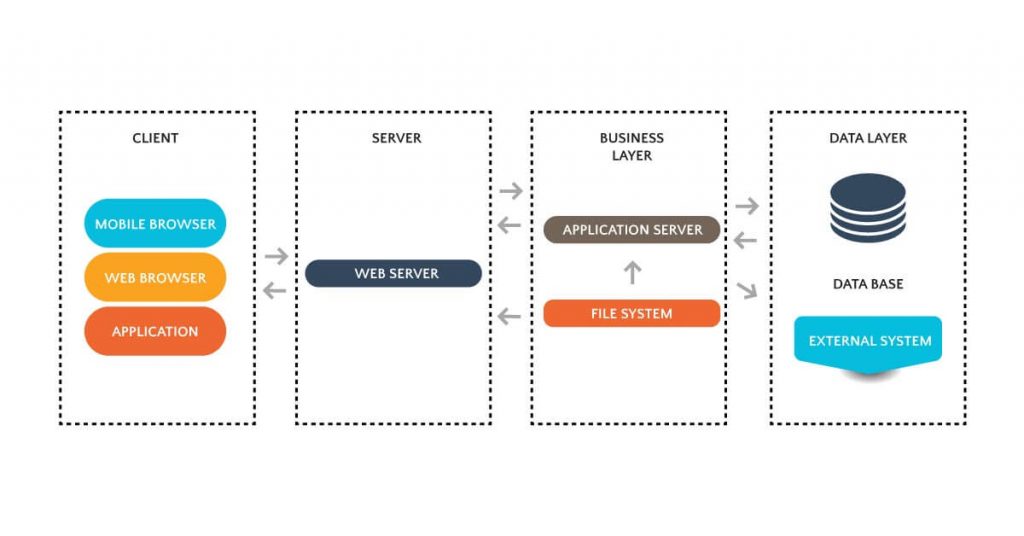
This is where your website takes shape. The layout of your website is implemented by choosing appropriate technologies such as HTML, CSS, PHP, and JavaScript. (Check out our best programming languages tips to help you choose what technology to use.) Defining the means and shape of user interaction will help you identify which technology must be utilized.
In this step, the basic page layouts of the website are coded including the navigation bar, internal links, and visual contents.
Content and copy creation is an important practice in marketing. Ensure that when you are creating your content, you are providing useful information to your audience, appealing to your potential customers, and preserving your current customers by consistently providing them with engaging content through killer copywriting tips.
At this stage, you will need to create catchy headlines, write new texts, incorporate call-to-actions, and prepare meta descriptions.
You need to generate topic ideas that interest your user persona and integrate information into the different web design elements such as images, infographics, videos, and other forms of content.
The quality assurance (QA) phase is a step in the web design workflow process that gives you a chance to review your code to make updates to the user interface (UI). You will need to ensure that the end product of your website observes the business’ quality standards. You are responsible for developing and implementing inspection activities, detecting and resolving technical problems, and providing satisfactory outcomes.
You will not just assess the website’s design but also its accessibility, technological framework, interactivity, and its originality.
For a website to be highly accessible, ensure that it can be loaded quickly and is accessible in different web browsers, operating systems, and screen resolutions.
Perform an overall functionality test to guarantee that everything is flawlessly working and that the website can sufficiently address the users’ needs.
This is the process of auditing the total content of your website to identify the areas that need to be taken out, enhanced or maintained.
Make sure that your content is search engine-friendly, can efficiently speak to your target audience, has consistent formatting, is free from any syntax errors, and can perfectly showcase your cohesive brand.
Before starting your content review, it is significant to know the fundamental pages of your website. Focus your efforts first on the homepage, product and service page, call-to-action page, and social proof page since these pages are critical to your sales conversion and lead generation.
Conducting surveys to assess your website’s user experience from your target audience through masking your business’ information is an effective way for you to view your website from a new user perspective. This step informs you of a more detailed review of the overall web design project.
With all the visuals and content set, it’s now time to test and launch your website. Thoroughly check every webpage to see if all links are functioning and the website can run on any device and web browser.
Now, it’s time for your website to reach the internet. This process moves your website to the live servers. You can use user-friendly software or research for reliable web hosting companies.
Note that web design is an ongoing process and is constantly requiring maintenance and development. Deploying your website to the live servers is not the final step. The beauty of the web design workflow is that it will never finish. Once your website reaches the internet, you need to regularly run user testing on the new features and contents, and update it depending on the current digital trends.
You can use information you recently learned from your website evaluations to further make strategic improvements. Continual updates and revision of your online marketing strategy will ensure the continuous attainment of your business goals.
You can also add other types of online marketing strategies such as using social media advertising and content marketing to support you in reaching a wider audience.
Generating an optimized web design workflow process gives you an overview of all the processes you will need to do and helps you in laying out the timeframes of every task. A smooth-running web design workflow will save you time.
Don’t forget to create an efficient web design workflow with these simple steps:
Need more tips on creating a web design workflow? Send us a note on our Facebook, Twitter or LinkedIn now, and build your perfect website with us!
